

Properly insulating your wine cellar is the most important step in protecting your wine. A well-insulated cellar creates a stable, sealed environment that stops temperature swings from ruining your bottles. This guide walks you through the key decisions so you can build a cellar that works perfectly, keeping your cooling system efficient and your wine safe.
Why A Sealed Environment Is Non-Negotiable
It helps to think of your wine cellar not as a room, but as a high-performance refrigerator. Just like your fridge needs insulated walls and a tight door seal to stay cold, your cellar requires a perfect, unbroken envelope to maintain its climate.
Without that complete seal, you're just cooling a leaky box. The main goal is to completely isolate the cellar from the rest of your home, preventing warm air from getting in and cool air from getting out. Any cracks, gaps, or poorly insulated spots become "thermal bridges" that bleed energy and force your cooling system to work overtime.
The Importance of Stability
Wine is sensitive to change. Its greatest enemies are fluctuation and instability. When the temperature bounces up and down, the wine inside expands and contracts. This repeated pressure can push the cork out or break its seal, letting oxygen in. That’s how a prized bottle turns into expensive vinegar.
Proper insulation acts as a thermal buffer, slowing down heat transfer so dramatically that the temperature inside stays almost perfectly constant. This stability is what allows complex flavors to develop over years or even decades, so the bottle you open is exactly what it was meant to be.
Controlling Humidity And Preventing Damage
Insulation is about more than just temperature; it's also your primary tool for managing humidity. The key is a complete seal using a vapor barrier, which stops warm, moist air from the outside from hitting the cold surfaces inside your cellar.
When that happens, you get condensation, which quickly leads to a cascade of problems:
- Mold and Mildew: Excess moisture is a breeding ground for mold, which can destroy labels, ruin expensive wooden racks, and even compromise the cellar's structure.
- Label Damage: High humidity will make your labels peel, bubble, or turn into a soggy, illegible mess. This can significantly reduce a bottle's resale value and appeal.
- Cork Integrity: While too much humidity is bad, too little is just as dangerous. Dry air can cause corks to shrink and crack, breaking their seal and allowing oxygen to spoil the wine. A well-sealed cellar helps you maintain that sweet spot of 60–70% humidity.
To build a truly stable environment, you need a few key pieces working together. This isn't a place to cut corners; each component plays a critical role.
Essential Components for Effective Wine Cellar Insulation
Each of these elements reinforces the others. Leaving just one out can compromise the entire system, turning your cellar into a constant source of worry.
A properly insulated and sealed wine cellar is the difference between a functional storage space and an expensive failure. It’s not a feature—it’s the entire foundation upon which climate control is built.
Ultimately, investing in proper insulation from day one is the smartest money you'll spend. It guarantees your cooling system can do its job, saves you on energy bills, and gives you the peace of mind that your collection is aging exactly as it should.
Selecting the Right Insulation and Vapor Barrier
When you're building a wine cellar, picking your materials is the single most important decision you'll make. Get this part right, and your cooling system will hum along efficiently. Get it wrong, and you'll spend years fighting a losing battle against temperature swings and destructive moisture.
The goal is simple: stop heat from getting in and stop water vapor from ever reaching the cold surfaces inside your cellar walls. To do that, you need to understand two things: R-value and the vapor barrier.
R-value is just a number that tells you how well insulation resists heat. The higher the R-value, the better it works. The vapor barrier is the unsung hero—it’s a sheet of plastic that blocks moisture. You need both working together perfectly.
Comparing Insulation Types for Your Cellar
Not all insulation is a good fit for the damp, cool environment of a wine cellar. Your choice here will directly affect performance, cost, and how much of a headache the installation will be. Let's look at the three main players.
- Closed-Cell Spray Foam: This is the gold standard for a reason. It's an insulator and a vapor barrier all in one. When sprayed, it expands to fill every single nook and cranny, creating a seamless, airtight shell that's incredibly effective.
- Rigid Foam Boards (XPS/Polyiso): These dense boards pack a lot of R-value into a thin profile, which is great for basements where space is tight. They resist moisture well, but—and this is a big but—you have to meticulously seal every joint and seam with specialized tape. Any gap is a failure point.
- Fiberglass or Mineral Wool Batts: This is your most budget-friendly route, but it's also the riskiest. These materials have great R-value, but they have zero defense against moisture. If they get even slightly damp, their insulating power disappears, and they become a perfect breeding ground for mold. Using them means your vapor barrier has to be absolutely flawless.
Here’s a quick look at how they stack up in the real world.
Wine Cellar Insulation Comparison
The Non-Negotiable Vapor Barrier
If there's one rule you absolutely cannot break, it's this: every wine cellar needs a vapor barrier. No exceptions. Even if you spring for closed-cell spray foam, think of a separate barrier as cheap insurance.
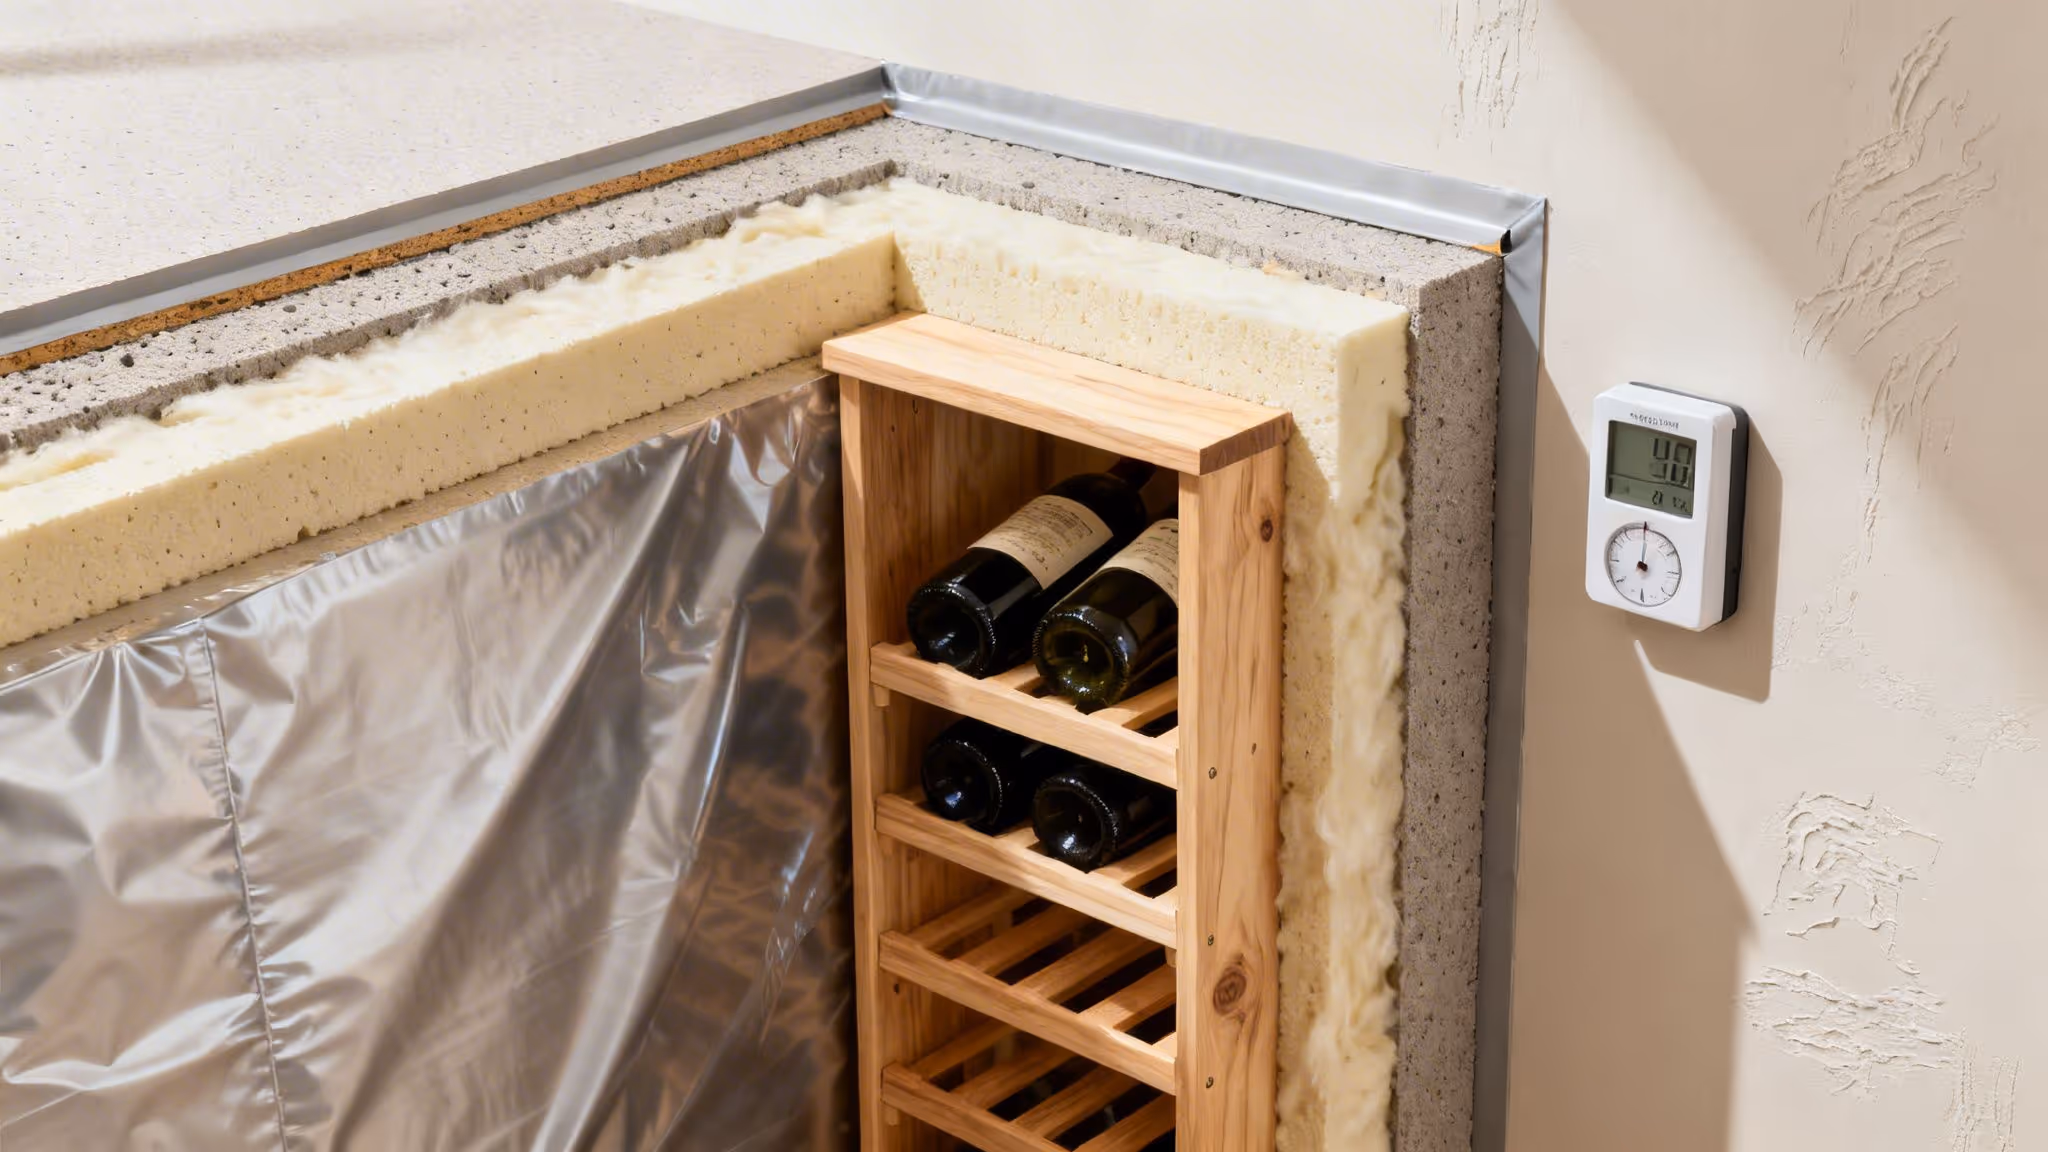
It needs to be made of at least 6-mil polyethylene sheeting. Crucially, it must be installed on the "warm side" of the insulation—that means on the outside of your cellar walls and ceiling, between the framing and the drywall of the adjoining room.
Why the warm side? The warm, humid air from the rest of your house is always trying to push its way toward the cold, dry air in your cellar. Placing the barrier on the warm side stops that moisture in its tracks, long before it can hit the cold insulation and condense into water. Condensation inside your walls leads to rot and mold.
Think of the vapor barrier as a perfect raincoat for your cellar's structure. It has to be a single, continuous sheet that wraps the entire room. Overlap all seams and seal them with acoustic sealant or approved tape. No gaps, no holes, no excuses.
Recommended Minimum R-Values
To keep your cooling unit from running 24/7, you need to hit certain insulation targets. These aren't just suggestions; they're the foundation for an energy-efficient cellar that will last.
- Walls: You should aim for a minimum of R-19. For a standard 2x6 wall, that means 5.5 inches of fiberglass or roughly 3 inches of closed-cell spray foam.
- Ceiling: The ceiling is even more important, since heat naturally rises. Go for a minimum of R-30 here. That translates to about 9-10 inches of fiberglass or 4.5-5 inches of spray foam.
If your cellar is next to a hot boiler room, a sun-baked exterior wall, or you live in a warm climate, it’s smart to go beyond these minimums. Investing more in insulation upfront pays for itself for years in lower energy bills and a longer life for your cooling system.
For more on how insulation impacts your cooling choices, check out our guide on how to properly climate control a wine cellar.
A Practical Walkthrough for Wall and Ceiling Installation
Alright, this is where your plans meet reality. Getting the insulation right in your walls and ceiling is the single most critical step in building a wine cellar. This isn't about speed; it's about precision.
Even tiny gaps or spots where the insulation is compressed can create “thermal bridges.” Think of them as secret highways for heat and moisture to sneak into your cellar, completely undermining all your hard work.
The job really breaks down into two main tasks: getting the insulation itself installed correctly, and then sealing the room completely with a vapor barrier. Each one requires a careful hand, especially when you get to the tricky spots like corners, light fixtures, and electrical outlets.
Installing Insulation Between Studs
Whether you’ve chosen rigid foam board or classic fiberglass batts, the mission is the same: fill every inch of the wall and ceiling cavities without leaving gaps or squishing the material.
- For Rigid Foam Boards (XPS): You'll want to cut each board for a snug friction fit between the studs. It should be just tight enough to hold itself in place, but not so tight that the board starts to bend or bow. A sharp utility knife and a good straight edge are your best friends here. I often recommend using a couple of layers of thinner boards and staggering the seams—it's a great way to stop air leaks.
- For Fiberglass Batts: When you're putting in fiberglass, just gently push the batts into the stud cavity and let them expand to fill the space. Never stuff or compress fiberglass. The moment you do, you crush the air pockets that give it its R-value, making it far less effective. You'll need to carefully cut the batts to fit around pipes or wires, making sure the insulation hugs them without any voids.
Pro Tip: Measure twice, cut once is the golden rule here. A really common mistake is cutting a piece just a hair too small. It might not look like much, but that tiny gap along the edge is a big problem. It’s always better to cut a piece slightly too big and trim it down for that perfect, snug fit.
The Art of the Perfect Vapor Barrier Seal
With the insulation in, it’s time to wrap the entire room—walls and ceiling—in a continuous sheet of 6-mil polyethylene plastic. This is your vapor barrier, and you cannot afford to get this wrong. Always remember: the vapor barrier goes on the warm side of the insulation, which is the side facing outside the cellar.
Start on a wall and unroll the plastic, stapling it to the face of the studs. Make sure you overlap any seams by at least 6-12 inches. And here’s the crucial part: every single seam, staple hole, and penetration needs to be sealed with a high-quality builder's tape (sometimes called sheathing tape) made for this job.
Your goal is to create a perfect, monolithic "plastic bag" around your cellar.
Handling Tricky Areas and Penetrations
Your perfect seal is most vulnerable wherever something has to poke through a wall or ceiling. We're talking about electrical outlets, light fixtures, and any plumbing.
- Electrical Boxes: The best solution is to use airtight plastic electrical boxes, sometimes sold as "vapor barrier boxes." If you have to use standard boxes, you'll need to meticulously wrap them in the polyethylene sheeting and seal them with tape before they get installed.
- Light Fixtures: Just say no to recessed can lights. They punch huge, leaky holes right through your insulated ceiling. Instead, opt for surface-mounted track lighting or wall sconces that don't actually break through that thermal envelope you've worked so hard to create.
- Corners and Joists: Don't just stop the vapor barrier at a corner. Fold it cleanly and continue it onto the next wall to maintain a seamless wrap. The same logic applies where your walls meet the ceiling joists or the floor.
This diagram helps visualize how your insulation choice affects the overall workflow.
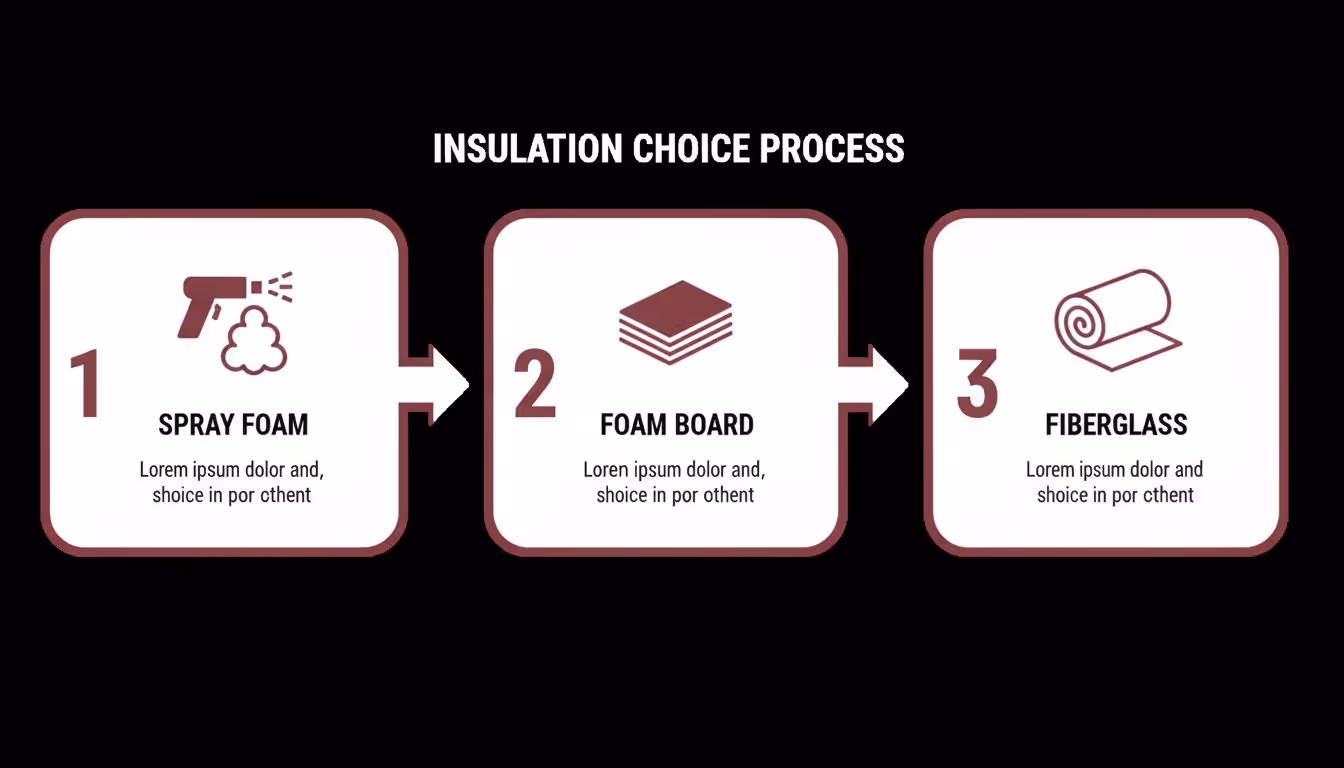
As you can see, spray foam does both jobs at once, while foam board and fiberglass need those distinct, careful steps to achieve both a high R-value and a perfect vapor seal.
Properly insulating your cellar is easily the most technical part of the build, but it's the foundation that protects your collection for years. In the same way, having a smart system for arranging your wines makes all the difference. For some practical tips on that front, you might find our guide on how to organize a wine cellar helpful for making sure your favorite bottles are always within reach. Take your time on these installation steps—getting them right ensures your cellar will perform exactly as it should.
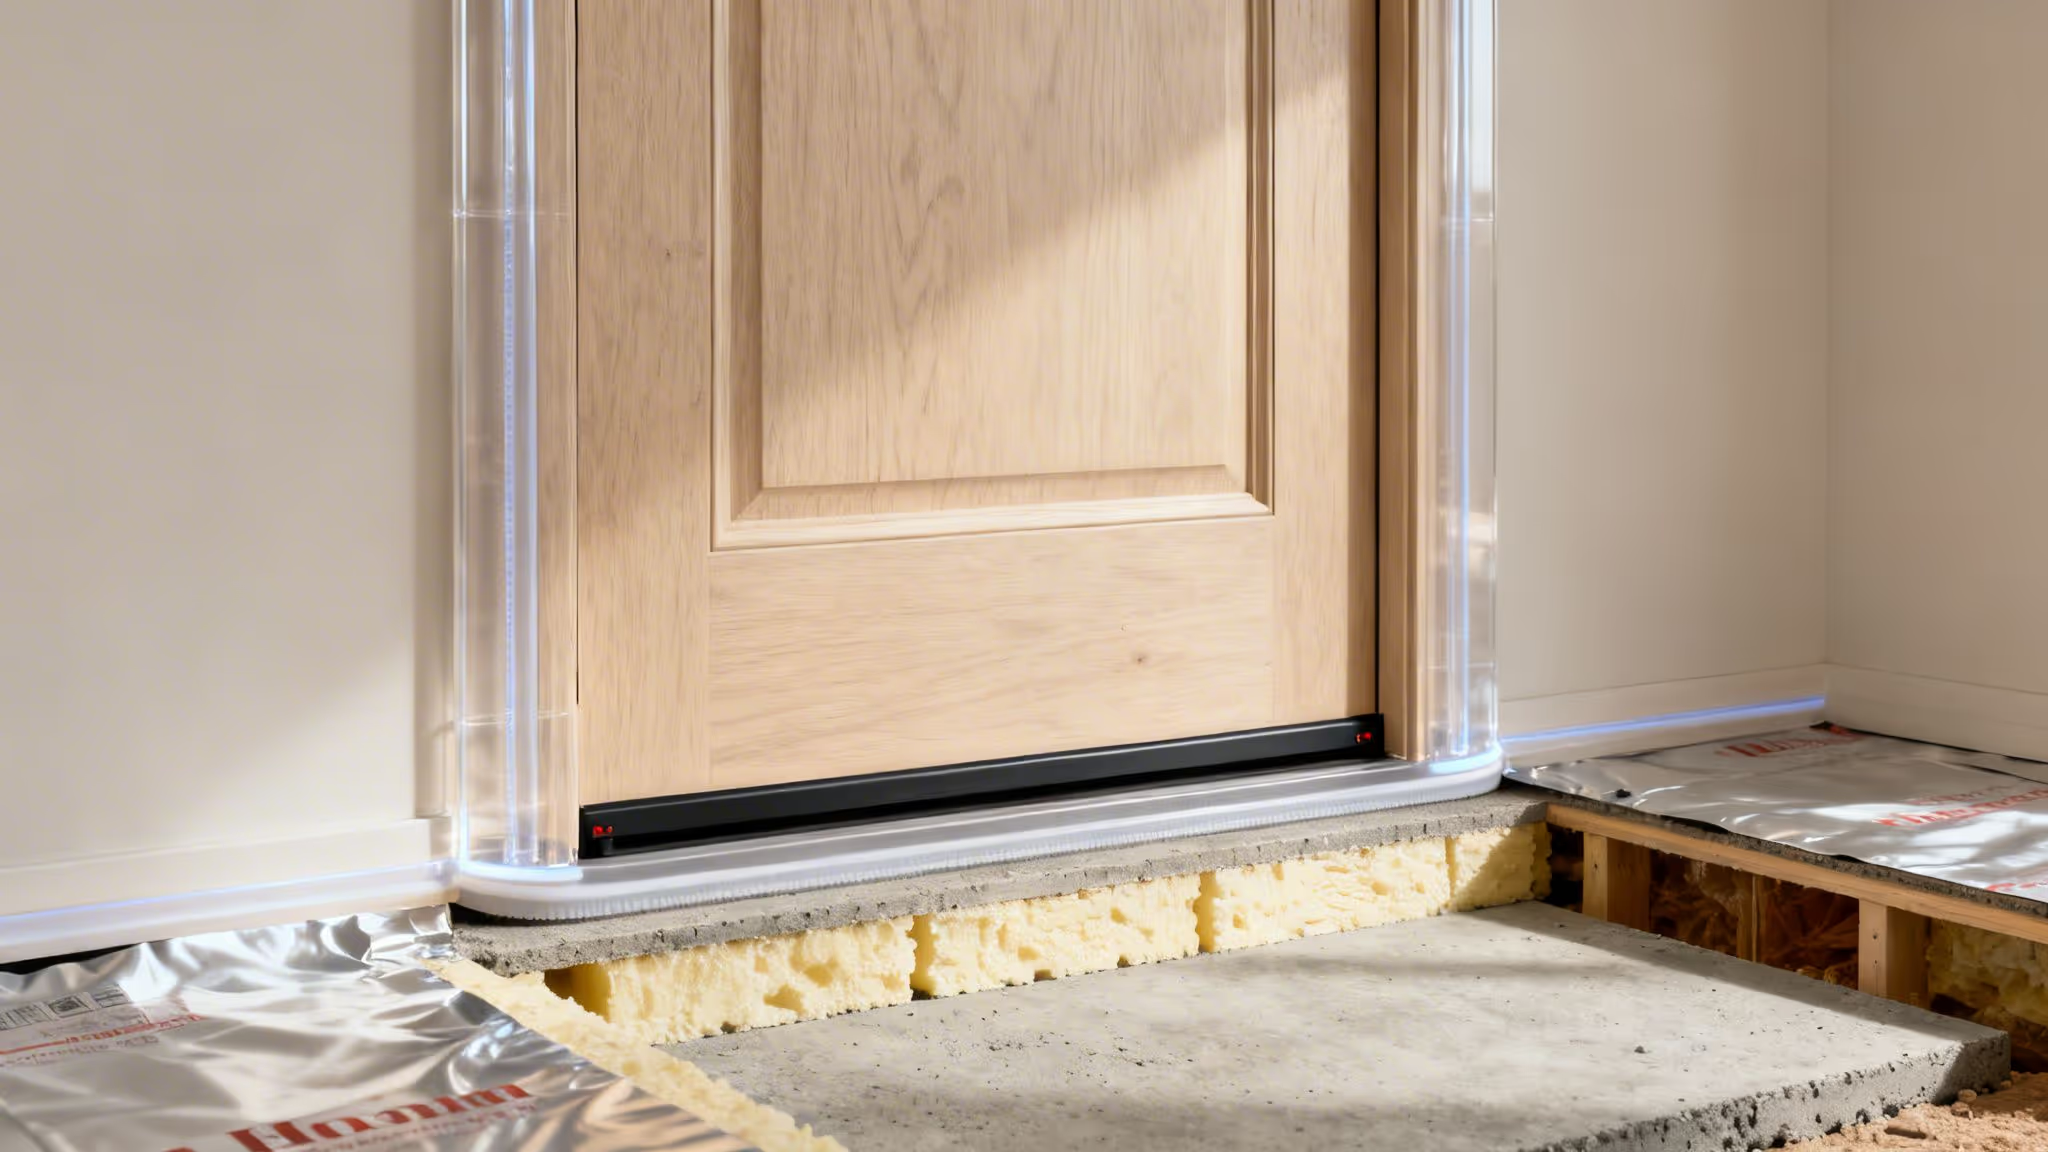
Sealing the Floor and Choosing the Right Door
You’ve done the hard work on the walls and ceiling, but don't drop the ball now. The floor and the door are the final, critical pieces of your wine cellar's "sealed envelope," and they're where a lot of people make costly mistakes.
A poorly handled floor can wick moisture right out of the ground, and a standard interior door might as well be an open window. It will constantly bleed cooled air, forcing your cooling unit to work overtime. Let's get these last two details right.
Insulating Different Floor Types
Floors are a sneaky source of temperature swings, especially in a basement. How you tackle it depends entirely on whether you’re working with a concrete slab or a wood-framed floor over a crawlspace.
For Concrete Slab Floors
Concrete is like a sponge for moisture and ground temperature. You have to treat it before your final flooring goes down.
First, I always recommend applying a quality concrete sealant. This sinks into the pores and creates your first line of defense against dampness.
Once that's cured, roll out your 6-mil polyethylene vapor barrier. Lay it right on top of the sealed concrete, making sure to overlap any seams by a good foot and tape them down. Run the plastic a few inches up the walls so it can integrate with your wall barrier.
Finally, lay down rigid foam insulation—XPS or Polyiso is best—directly over the vapor barrier. You’ll want an R-value of at least R-13. After that, you can install your subfloor and whatever beautiful flooring you’ve picked out.
For Wood-Framed Floors
If your cellar sits over an unconditioned crawlspace or basement, the job is a little different. You'll be insulating from underneath.
Get into the crawlspace and fit rigid foam boards snugly between the floor joists, directly against the underside of the cellar's subfloor. Closed-cell spray foam is also a fantastic, albeit more expensive, option here.
Just remember the golden rule: the vapor barrier always goes on the warm side. In this situation, that means it gets installed inside the cellar, on top of the subfloor, right before you lay your finished flooring.
A common mistake is to skip floor insulation entirely, assuming the ground is naturally cool. However, ground temperature varies seasonally and is almost never the ideal 55°F. Insulating the floor is essential for year-round stability.
The Door: Your Cellar's Biggest Vulnerability
You could have the best-insulated room in the world, but if you hang a standard, hollow-core interior door, you’ve just punched a massive hole in your system. An interior door offers practically zero R-value and no real seal.
Think of your wine cellar door as an exterior door to your house. It has to perform.
A proper wine cellar door needs a few non-negotiable features:
- Solid Core Construction: It absolutely must be an exterior-grade, solid-core door. This gives it the thermal mass to fight off heat transfer.
- Comprehensive Weatherstripping: The door frame has to be fully weather-stripped on all three sides. When you close it, you should feel a slight bit of pressure or hear a soft "whoosh" as it creates an airtight seal.
- An Automatic Door Bottom: This is the secret weapon. It’s a mechanism hidden in the bottom of the door. As the door closes, a tiny plunger hits the jamb and triggers a rubber seal to drop down, sealing the gap against the threshold perfectly. This one component stops a huge amount of air leakage.
Getting the door right isn't just a final touch; it's a fundamental part of protecting your wine. A perfect seal keeps the cool air in, ensuring every bottle ages just as it should.
Integrating Your Cooling System and Avoiding Common Pitfalls
Think of your insulation and cooling unit as a team. If one slacks off, the other has to work twice as hard. Incredible insulation with a high R-value lets you get away with a smaller, quieter, and more energy-efficient cooling system. That saves you real money, both upfront and on your monthly power bills.
When your cellar is properly sealed and insulated, the cooling unit isn't constantly battling temperature swings from the outside world. It just hums along, maintaining the perfect climate instead of struggling to create it from scratch. This means it runs less often and lasts much, much longer.
It’s like wearing a thick winter coat in a snowstorm. The coat (your insulation) does most of the work, so your body (the cooling unit) doesn’t have to burn a ton of energy just to stay warm. A well-built cellar works the exact same way.
Matching Insulation to Your Cooling Unit
One of the most common—and expensive—mistakes is picking a cooling unit based only on the cellar's cubic footage. A true professional calculates the "heat load," a number that accounts for your insulation's quality, the ambient temperature outside the cellar, and even how often you plan on opening the door.
Putting R-19 insulation in the walls and R-30 in the ceiling dramatically lowers this heat load. This often means you can choose a less powerful (and less expensive) cooling unit. It's tempting to buy a bigger unit "just in case," but an oversized system is just as bad as an undersized one. It can lead to short-cycling, which wears out the compressor and fails to properly dehumidify the air.
The investment you make in high-quality insulation and meticulous sealing directly translates into long-term savings. A smaller, more efficient cooling unit can cost hundreds less to purchase and hundreds more in energy savings over its lifespan.
Ventilation and Condensation Management
Every wine cellar cooling system does two things: it blows cool air into your cellar and pushes warm exhaust air out. Managing that exhaust and the condensation it creates is absolutely critical.
- Exhaust Ventilation: You can't just dump the warm air from the unit into a small closet or an enclosed space. It has to be vented to a larger, well-ventilated part of your home or even ducted outside. If it can't dissipate, the unit will overheat and shut down.
- Condensation Drain Line: As the unit cools, it pulls moisture from the air. This water collects in a pan and has to go somewhere. Most units need a drain line, and it must have a continuous, gentle downward slope. If it's flat or slopes the wrong way, water will back up and cause a mess.
The Most Common—and Avoidable—Mistakes
Learning from the failures of others is the cheapest tuition you'll ever pay. When it comes to wine cellar insulation, a few specific errors are responsible for the vast majority of problems I get called in to fix.
Pitfall 1: Placing the Vapor Barrier on the Wrong Side
This is, without a doubt, the single most destructive mistake you can make. The vapor barrier must always go on the warm side of the insulation—meaning the exterior of your cellar walls.
If you put it on the cold, interior side, you will trap moisture inside your wall cavity. It’s not a matter of if, but when you’ll get mold, wood rot, and potentially catastrophic structural damage.
Pitfall 2: Using the Wrong Door
A standard, hollow-core interior door is basically a giant hole in your insulation plan. It offers almost zero thermal resistance and will bleed cold air around its edges constantly.
You absolutely must use an exterior-grade, solid-core door fitted with a complete weatherstripping seal and an automatic door bottom. This is not the place to try and save a few bucks.
Pitfall 3: Ignoring the Floor
So many people think a concrete basement floor is "naturally cool enough." The problem is, the ground temperature fluctuates and is almost never a perfect 55°F.
Insulating your concrete slab or the floor above a crawlspace is non-negotiable. An uninsulated floor will constantly suck warmth out of the ground and pull it right into your cellar, forcing your cooling unit to work overtime, year-round.
Avoiding these few pitfalls is the key to making sure your insulation and cooling system work together perfectly. It’s how you create that stable, reliable environment your wine collection truly deserves.
For those times you need a bottle ready for dinner on short notice, you might find our guide on how to chill wine fast useful for a quick solution that won't harm the flavor.
Your Top Wine Cellar Insulation Questions, Answered
Even the best plans can hit a few snags. When you're dealing with the nitty-gritty of insulation, a few common questions always seem to come up. This isn't just construction; it's about creating a perfect, stable environment for your wine.
Here are the straightforward answers to the questions I hear most often, so you can finish the job with confidence.
Do I Really Need a Vapor Barrier with Spray Foam?
Yes. Don't even think about skipping it. While it's true that closed-cell spray foam acts as a pretty good vapor retarder on its own, you absolutely still need to install a dedicated 6-mil plastic vapor barrier on the warm side of your cellar walls.
Think of it as cheap insurance for a very expensive investment.
A separate plastic sheet gives you a perfect, unbroken seal that spray foam alone can't guarantee. It’s your last line of defense against moisture and condensation sneaking into your wall cavities over the years, which is what leads to mold and rot. It’s a small step that pays off big time.
A dedicated vapor barrier is your ultimate safeguard. Even the best spray foam job can have tiny gaps or imperfections; the 6-mil plastic ensures nothing gets through.
What's the Minimum R-Value I Should Be Aiming For?
To get the performance and efficiency you need, you have to hit certain numbers. These aren't just suggestions—they are the real-world minimums for a cellar that actually holds its temperature without running your cooling unit into the ground.
- Walls: You need at least R-19.
- Ceiling: Go for R-30 or more. Heat rises, and your ceiling is a major battleground for heat gain.
- Floors: If your cellar sits above an unconditioned space like a garage or crawlspace, that floor needs R-13 minimum.
If you're building in a particularly hot or cold part of your house, like an attic or a south-facing garage wall, don't just meet these numbers—beat them. A little extra insulation now means lower energy bills and less wear and tear on your cooling system for years to come.
Can I Put Recessed Lighting in My Cellar Ceiling?
I strongly advise against it. Every single recessed "can" light is a major hole punched through your thermal envelope. It’s a direct highway for heat and moisture to pour into the space you just worked so hard to seal.
Instead, stick with lighting that doesn't compromise your ceiling.
Smarter Lighting Choices:
- Surface-Mounted Track Lighting: This is the go-to choice for a reason. It mounts right onto the finished ceiling, so you don't have to cut massive holes in your insulation and vapor barrier.
- Wall Sconces: These are great for creating ambient light and are installed on the walls, leaving your perfectly insulated ceiling completely untouched.
If you are absolutely set on recessed lights, you have to use special IC-rated (Insulation Contact) airtight fixtures. Even then, you’ll need to build insulated boxes around each one in the space above. It adds a ton of complexity and creates more points where your seal can fail. It's a huge risk for a small aesthetic gain.
Deciding on the right insulation is a lot like choosing the right wine—the details matter, and a little guidance goes a long way. For those moments when you're standing in front of a wine list or a packed store shelf, Sommy can help you choose confidently without needing to be an expert. Instead of guessing, let Sommy's AI learn your taste and recommend the perfect bottle for your meal or mood. Try it at https://www.sommy.ai.

EntreprEngineur. Runs on latte's. Creates with the intensity of a downhill run—fast, slightly chaotic, ideally followed by a glass of wine.